Silicone Breastplates: Pros, Cons and Possible Mods
While breast pumping can indeed enlarge your boobs, it’s a time consuming and somewhat uncomfortable process. I was able to add a couple of inches, but grew impatient, so lately I’ve taken a shine to Silicone Breastplates (SBPs) as a better alternative to bra pads. Unlike bra pads, these cover the whole chest.
There are a LOT of options and sizes.
Pros:
- They feel great on the skin.
- They move beautifully, more so with silicone filler than cotton.
- You don’t need a bra
- They feel realistic
- You can go pretty much any cup size, and I do mean ANY, including G and well beyond.
Cons:
- They are more expensive than bra pads, and can be a LOT more expensive for the best ones.
- Most brands are a pain in the ass to put on. Reason: The silicon tends to curl and kind of lightly stick to the skin. More on how to alleviate this below.
- If you go over a C-cup, definitely check the type of filler, cotton or liquid silicone because weight does matter, believe me. 10 lbs may not sound like a lot, but try wearing that for hours. Think cotton if you go big boob, liquid silicone filler can get very weighty. Always check the weight before buying!
- Most brands have high necks, which can be somewhat uncomfortable.
- Colors are usually pretty limited, and unless you’re lucky, you won’t get an exact skin match. But you can get close.
If you are going to get a breastplate, I really advise against hollow ones with no filler. These are really old school and frankly tend to be terrible.
Most brands go on like a turtleneck shirt. This can make them a pain to put on, because the silicone does tend to curl and stick to your skin as you wrestle it onto your chest. Be careful about stretching too much! You can puncture thin areas (usually around the bottom). Manufacturers suggest this fix: talcum powder and your body and/or the inside of the breastplate.
This does work and the SBP will slide on easier. But talcum powder (baby powder) is a messy drag. I have another option for you . . . it’s down below.
If the high neck bothers you, just trim it off. Just be careful and do a little at first until you get the hang of it.
I can’t advise you on color. I suppose you could smear your foundation on your bp, but of course when you wash the thing, that’s likely to come off.
Radical repairs and modifications
Now a serious warning: Cutting a SBP can result in serious damage to the product. I’m not kidding about this. If in doubt, do not do it. I am not responsible for any damage to your product. And believe me, the manufacturer won’t be either.
I can only tell you what I have personally done. So please, don’t do any cutting, gluing, or modification if you have any doubts.
I’ve only found one manufacturer, Ivita, which sells SBPs with straps and open backs rather than full backs like most others.
A full back sounds nice, and it is, once you wrestle it down, but straps are a lot easier to get on and off. Ivita seems to sell most of their SBPs with liquid silicone filler. Great except when you get a bit bigger, so definitely check the weight (you’ll be converting grams to pounds so be mindful of this!).
I’ve given up on full back SBPs, they’re just too much of a hassle to get on and off. But there are a lot more color, skin and size options from these manufacturers. So what to do? Mods, baby, mods.
The first, and easiest one is trimming excess neck areas. Just go slow at first. You’ll find the right neck height for you.
The far more radical mod is removing part of the full back and creating your own straps. They are basically like back bra straps, only using Velcro for attaching, rather than hooks and eyes.
Here’s what you’ll need to do this:
- Sew-on Velco. Not self-adhesive, SEW ON only.
- Scrap fabric, cotton scrap from an old shirt will work really well. No slippery stuff!
- Scissors, needle, thread. Get a rather strong needle, slender ones won’t penetrate as well.
- Sil-poly adhesive
Which hopefully you won’t need but it’s very handy for repairs. Silicone to silicone adhesion is great. Not so hot for silicone to other materials—hence the sewing you’ll have to do.
- Plastic clothespins to hold repairs done with the Sil-poly.
Before starting, try on your investment. If you’re happy with it, leave it alone.
I’ll show cutting and beyond in the copy and pictures below:
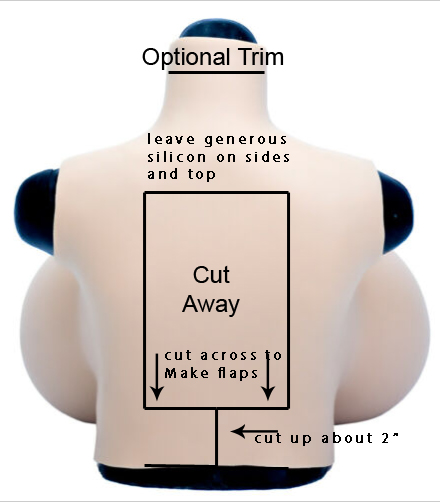
Trim the neck first
Then cut the flaps. Mark about two inches from bottom horizontally, and cut up from the bottom center to that line. Cut out the back but leave plenty of space on the sides and below the neck. Cut to close to sides and they’ll lose too much strength, same at the top.
Now you have flaps at the bottom and an open back.
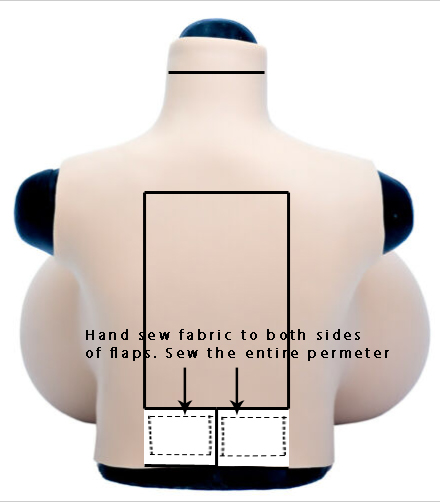
Sewing time. Cut two pieces of fabric that are long enough to wrap around each individual flap. You are covering the outside and inside of both flaps. Say each flap is 6” and 2” wide. Each fabric piece should be at least 10 inches long and 2” wide. Wider if you want fabric covering all the edges.
Next, HAND sew all around the edges of the fabric, securing it to a flap. Try to get a good ¼” silicone flap under each stitch. Keep your stitch distances close. It’s stronger and prevents tearing when the flaps are stretched.
Now why are you doing fabric? Reason: The Velcro strips won’t adhere to the silicone directly. If someone knows how to do this, let me know. But I can tell you that the fabric trick works great.
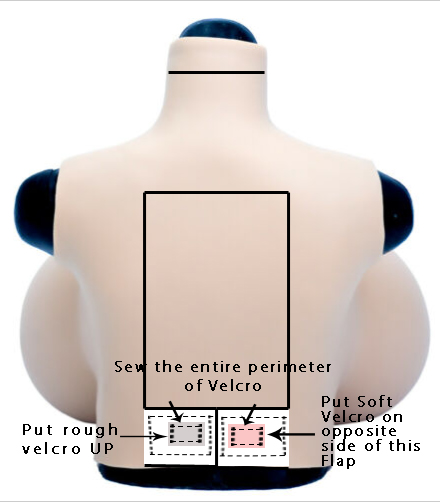
Position the Velcro strips on the flaps. You want the ROUGH side up on top of the left flap, and the soft Velcro strip on the back of the right flap. This is so the rough side never touches your skin. Sew the entire perimeter of the Velcro thru the fabric and the silicone. Do the entire perimeter of each.
Now, when you wear your SBP, you will take the right side soft Velcro flap and apply it to the rough side flap. You’ll be stretching things a bit but you should be fine if you haven’t cut the flaps too far into the sides.
Issues and repairs.
You’ll note that I haven’t mentioned the Sil-poly adhesive yet. Here’s where it MIGHT come into play.
Suppose the flap area is very thin, maybe too thin to withstand much stretching. Well, one possible way to alleviate this is to cut additional flap strips from the scrap material of your back cutout. You can then glue these flaps on top of your original flaps using the Sil-poly. This stuff sets in about an hour, but needs a full 24 hours to reach optimal adhesion.
This stuff is good for patching and preventing tears in vulnerable spots. And you can use scrap from your cuts to really secure it. Now you might need plastic clothes pins to hold joined pieces. Just try to avoid getting the Sil-poly on anything you don’t want glued. BTW: this stuff smells like strong vinegar so work in a well-ventilated room.
Mods completed, try it all on. It should go on a LOT easier. Sure there may be some rolling of the silicone, particularly around back arm holes, but it’s easy to correct with fingers. Whole thing goes and off a lot easier!
The Breast Form Store has a full line of breastplates.
Category: crossdressing, Transgender Body & Soul


