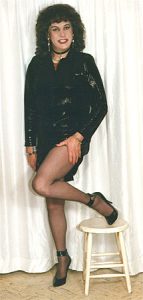
Retro Rerun: Setting Up And Using a Photo Studio Area
By Julie Peters
Putting Your Studio Together
Where can we find a place to take pictures of ourselves that are more than everyday pictures or “snapshots?” These are the more formal or professional types, which have a finished, or studio looking quality.
What you are looking for is control; control of the background, the lighting, the overall look and mood of the picture. Something that looks polished and planned.
What Is the Criteria?
An open and uncluttered area. It must be secure and relaxed a place where you can create a mood and feel comfortable. It should be large enough to contain a background, lighting equipment, camera and tripod, and a full-length mirror. An area 10 feet wide and 15 feet long is suggested. This will allow you to take full-length pictures and use a seamless background. For most of us, myself included, this will be a temporary setup. Don’t despair, read on and I will tell you how it worked for me.
Option One: The Pro Way
The elements will be a background, a light colored neutral (an off-white or cream.) The professionals use a seamless paper roll or a muslin cloth painted with various patterns (most resemble a well used painters drop cloth.) Both items are available from photo supply stores or mail order. Typical paper sizes are 107 inches wide by 12 feet long, and cloth backgrounds are 9 by 12 feet Both must be supported or hung between two poles about 8 ft. above the floor. I use a set of adjustable floor to ceiling poles called Pole-Cats. You can also use tension poles sold to support lights and hanging plants. You must be careful of the weight you put on this type of pole because it is made of lighter materials and will not support much weight. A length of pipe or electrical conduit supports the background between the poles.
You can screw two heavy-duty hooks into your ceiling and used a “slack” nylon rope to support the background. Placement of the lighting is done with another pair of Pole-Cats or tension poles. I would not use incandescent lighting because of heat and possible electrical circuit overload. Electronic flash units are small, convenient, and easy to place and use. I recommend the use of a diffuser on the flash unit. I use the on-camera flash to trigger slave flash units located on either side of the camera. These are AC flash heads that screw into a light bulb socket and have light diffusers in front of the flash. The light sockets have clamp-on assemblies and clamp to the poles. I bought my flash units, slave triggers, clamps, and poles from a mail order company in NYC that is no longer in business. Similar units are still available from other sources. (See Shutterbug or Popular Photography magazine.)
Another type of lighting are stands with mounting heads that direct the flash backward into a reflective umbrella. This type of flash takes up more room. The clamp-on units are smaller and easier to use. They can be attached to almost anything: poles, chairs, or furniture. A diffuser can be made by draping a double layer of handkerchief over the flash (be careful not to cover the sensor port or slave trigger.)
The most important thing you will need is a full-length (or near a full-length) mirror. This is a must have item. I place mine directly behind the camera and angle it so I can see myself when I am posing in front of the camera. I made mine from 12 x 48 inch door mirrors mounted on two 6 foot pieces of plywood hinged on one edge.
How Did This Work For Me? Well, to be honest with you, it didn’t. I setup the seamless background and lighting using four Pole-Cats. It was in my living room, in front the fireplace, the largest area I could find. It was a lot of work to setup and I left it up for three days (fortunately nobody came by to visit!) The pictures came out well and looked good. I couldn’t leave it up, and it was a lot of effort to assemble and take down.
Option Two: Working With What You Got
My next attempt was to use the other end of the living room, which had beige colored floor-to-ceiling drapes over a front window. This worked out rather well. All I needed to do was push a chair and coffee table to the side, and setup the poles and camera. Nowhere near as good as the seamless background, but very acceptable.
Later, I remodeled a bedroom into an office, with a desk, file cabinets, and bookcases (to the ceiling, almost.) The room is roughly 12 feet square. I bought a set of cream color drapes (two panels 72 inches wide and 80 inches long.) I mounted a drape rod to a wooden frame that sets on the top of a bookcase, and goes across to a 1 x 2 support on the desk. This gave me a background 9 feet wide by 80 inches high. The background is in front of a bookcase, so I lost 2 feet from the room length. This left no room for a mirror behind the camera. I solved this by replacing the sliding doors of a closet, opposite the background, with mirrored glass doors. Now I have an area that I can setup and take down with little effort.
If you look around you can find a suitable area to use in your home. It may not be ideal, but it will let you take pictures in which you are the main element with no distractions. They should be professional looking in quality.
Like to make a comment? Login here and use the comment area below.
Category: Transgender How To


